
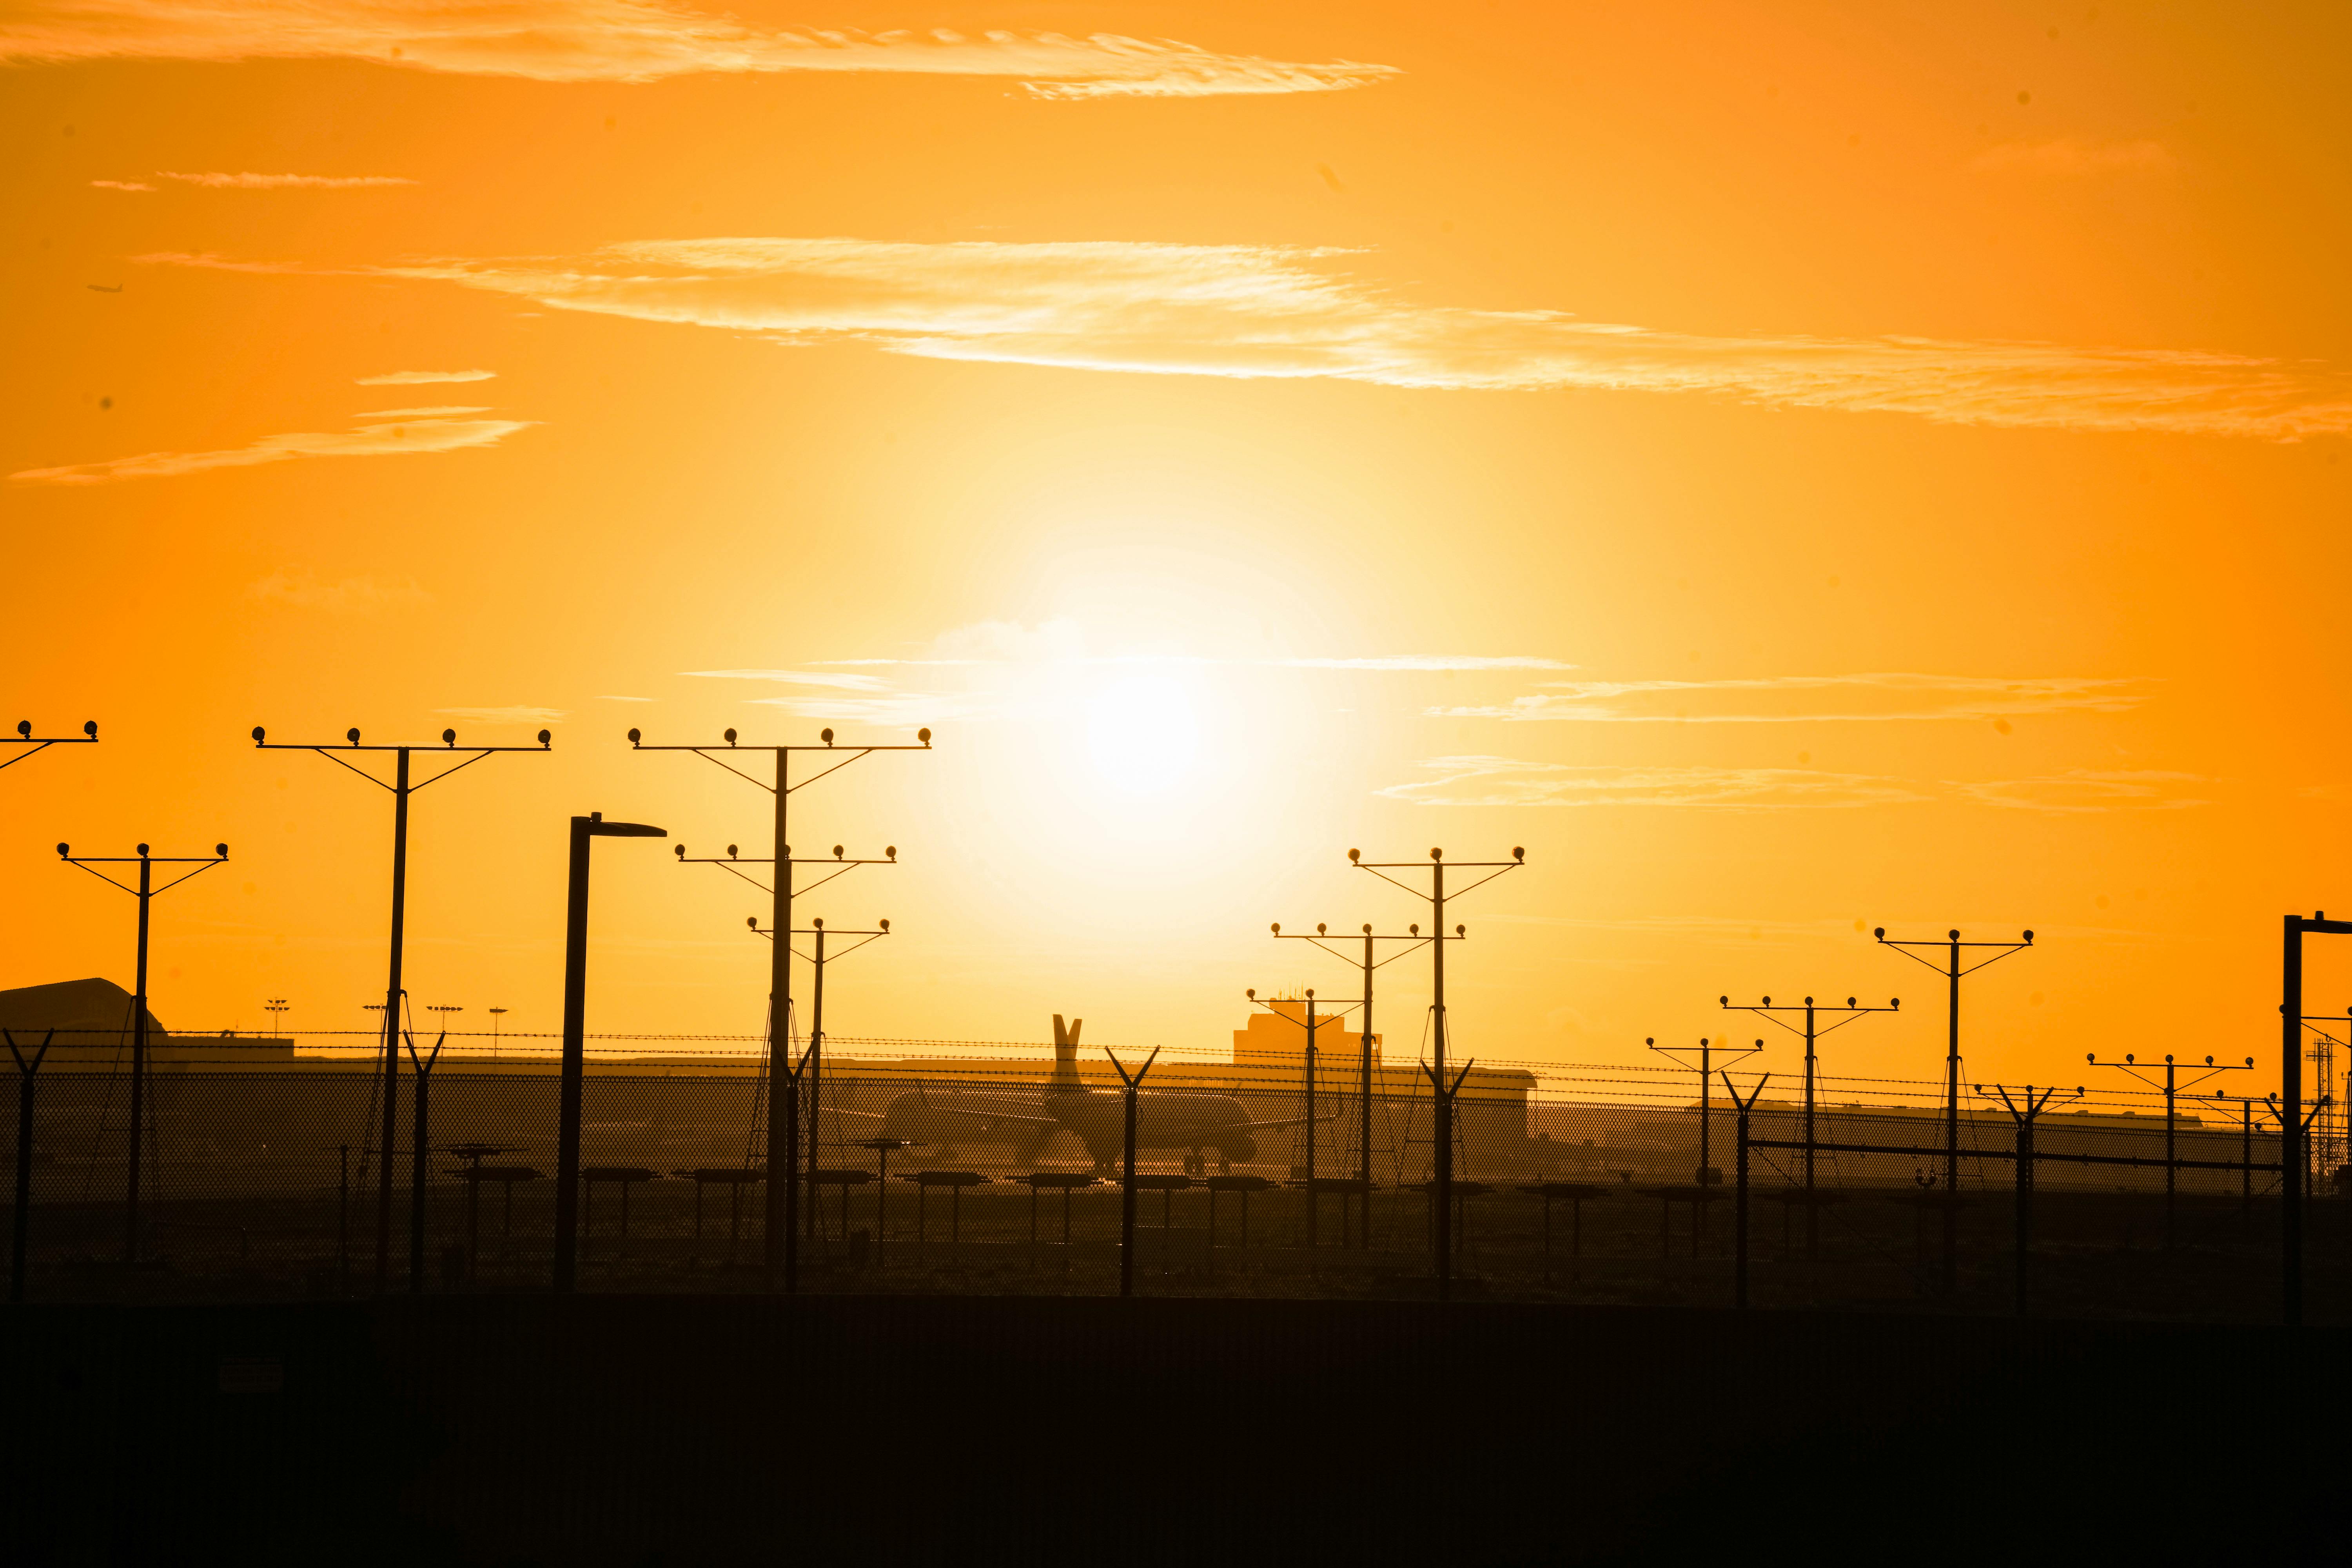
Lo‑fi travel photography is everywhere in 2025. You see it in reels, short clips, and dreamy city shots. The lo‑fi look feels warm, nostalgic, and real. It still works even when you rush through airports and train stations. This guide will show you how to capture motion blur, soft focus, and bold color safely while you travel.
We will also look at smart ways to carry your camera. That means less stress and fewer drops. You will have more time to enjoy the road. Whether you are a weekend traveler, an outdoor pro, or a new hobby shooter, you can use these simple lo‑fi tips right away.
What Lo‑Fi Travel Aesthetics Mean in 2025
In 2025, lo‑fi travel aesthetics push back against perfect, polished images. Many photos online now use AI tools. People want photos that feel human and a bit rough. Lo‑fi styles use grain, blur, and color shifts to build that mood. They feel like film, even when you shoot digital.

Trend reports show that lo‑fi photos often use grainy textures, soft focus, and light leaks. Colors may look muted or slightly shifted. Some styles copy VHS tapes or old point‑and‑shoot cameras. Others add dreamy, glowing light. The goal is not perfect detail. The goal is to show how a place felt in that moment.
Key Lo‑Fi Elements You Can Use While Traveling
When you travel, you rarely have time for complex setups. So focus on a few simple lo‑fi tools you can use on the move:
- Motion blur to show speed in streets, trains, and markets.
- Soft focus for dreamy portraits and gentle landscapes.
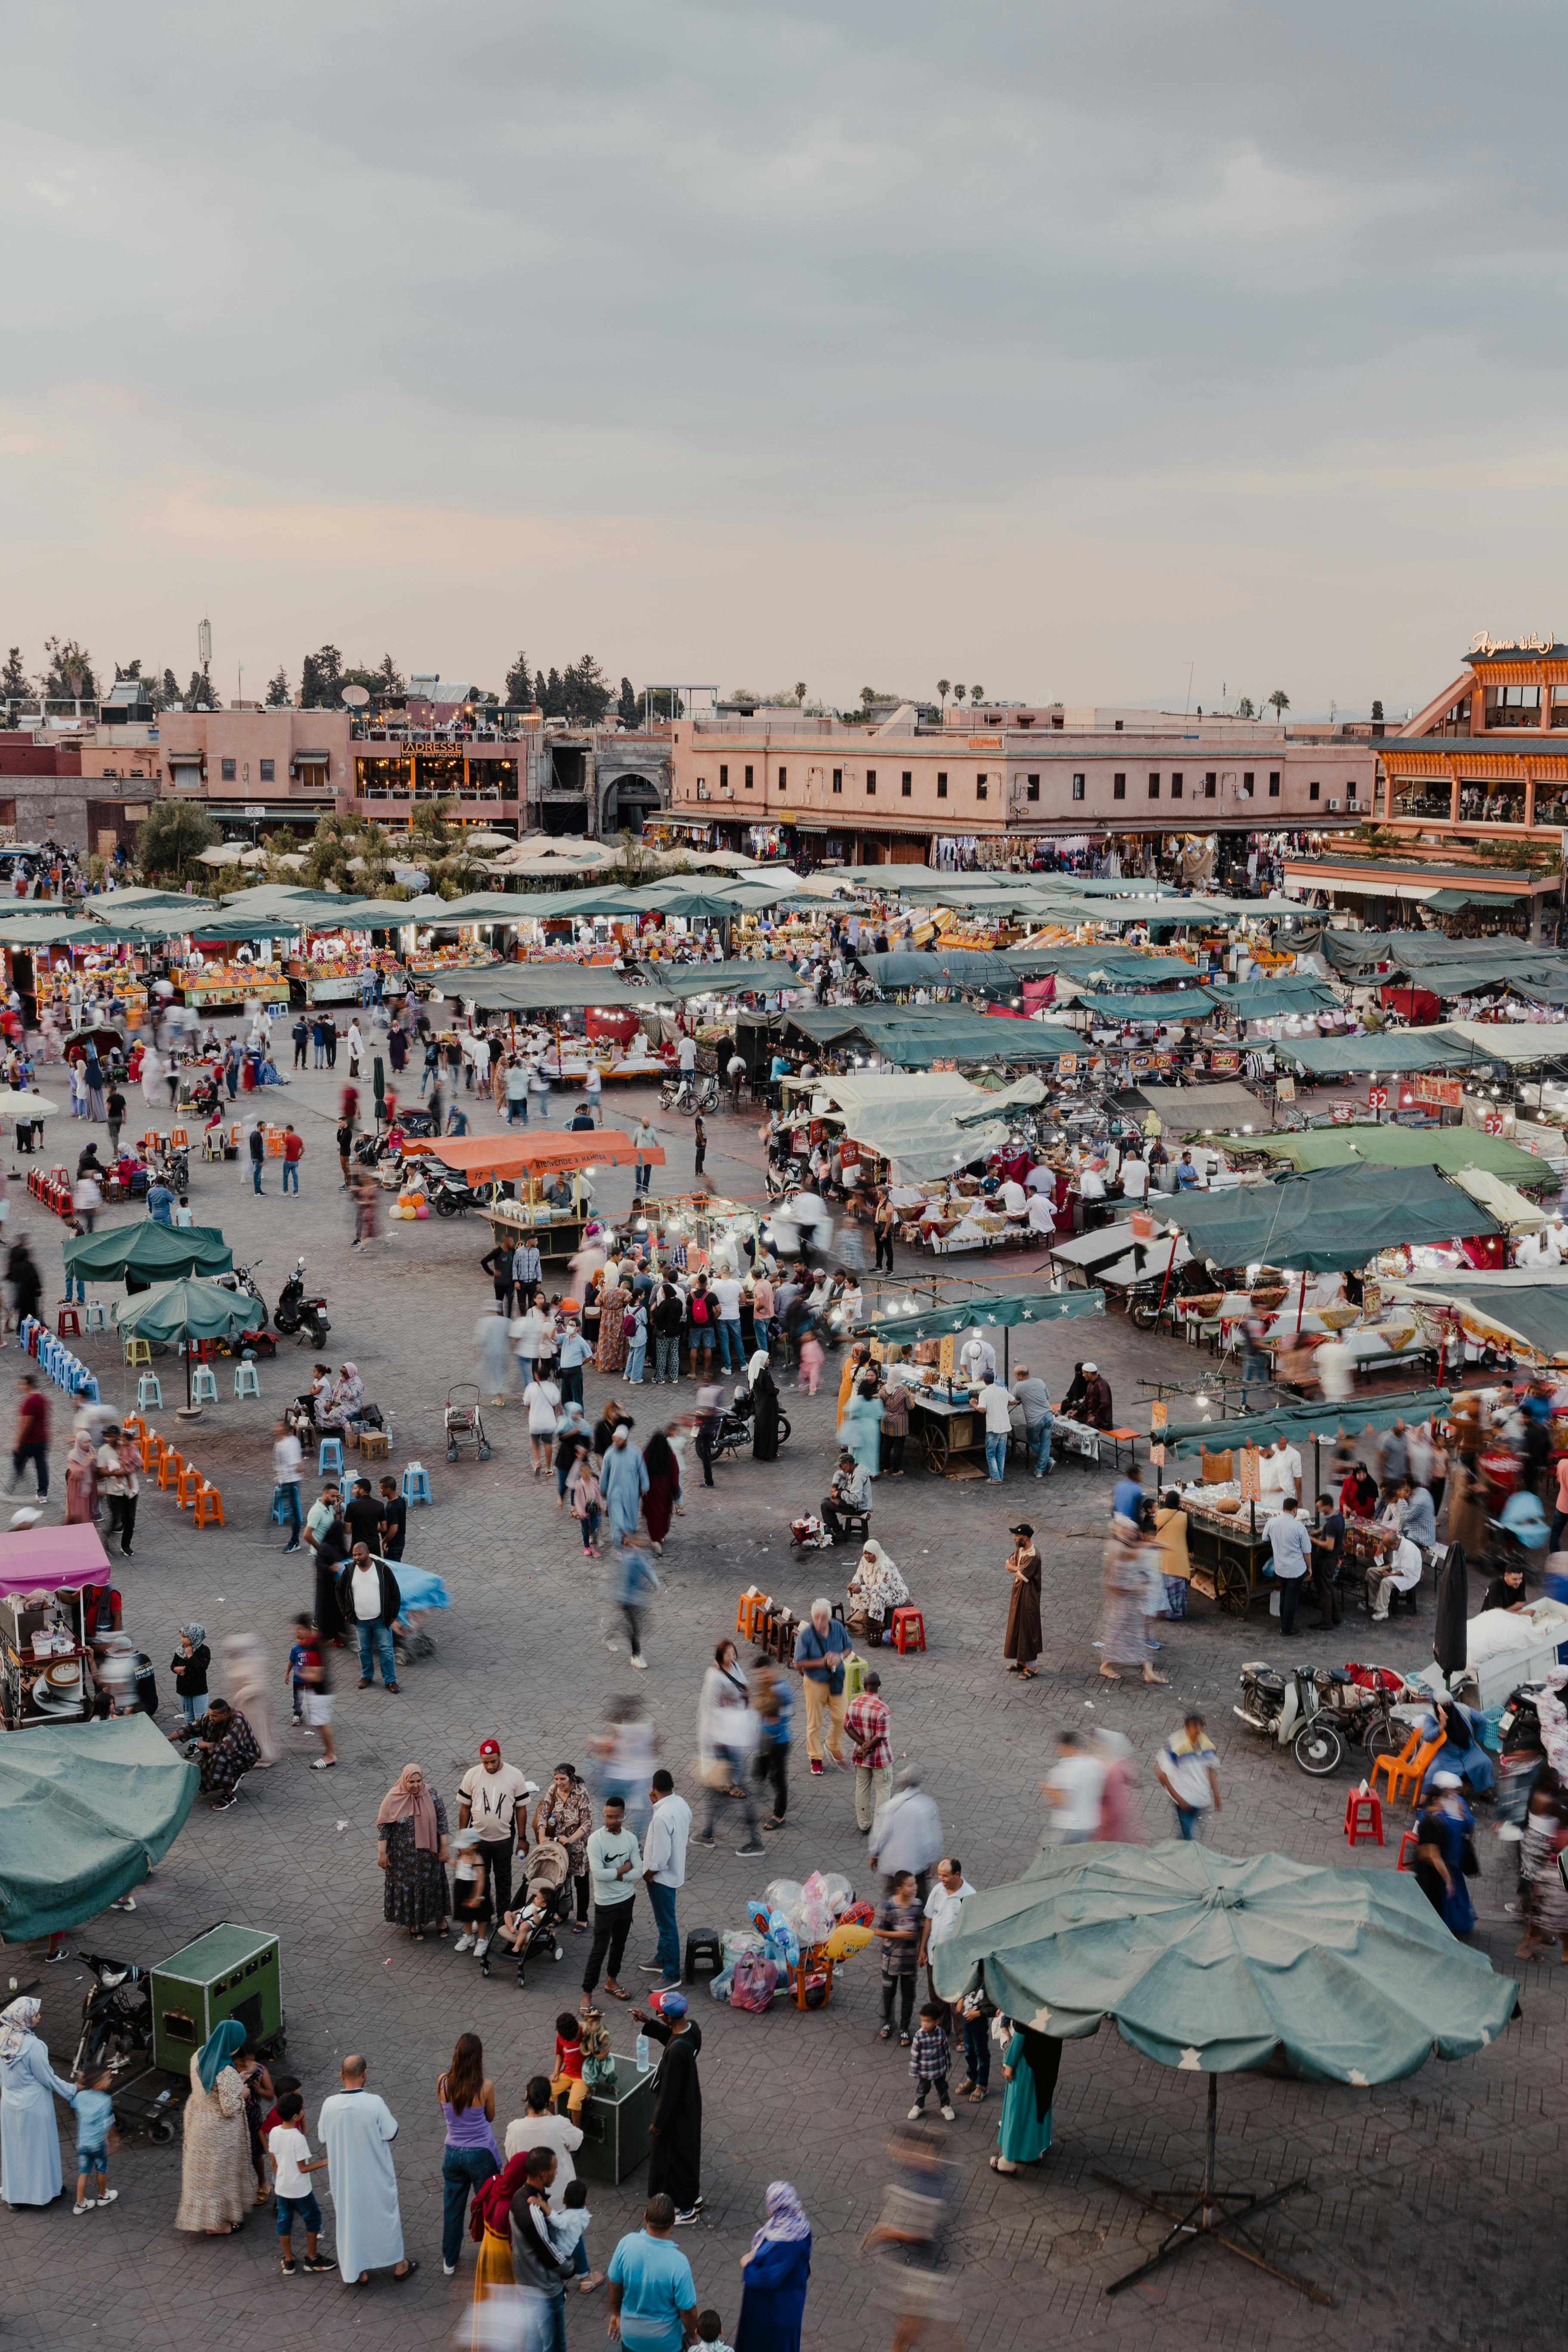
- High‑saturation color for bold sunsets, neon signs, and busy markets.
- Grain and noise from higher ISO or editing to add a film feel.
- Simple framing that feels casual, like a quick snapshot.
But lo‑fi does not mean careless. You still need to think about safety, camera control, and respect for people and places. The next sections will help you mix lo‑fi style and safety as you move.
Staying Safe and Mobile: Gear and Carry Setups for Lo‑Fi Travel
Lo‑fi travel aesthetics often come from fast, reactive shooting. You grab your camera, turn, and shoot before the moment is gone. That speed can lead to drops, bumps, or sore shoulders if your setup is not smart. So it helps to plan how you carry your camera before you leave home.
You do not need a huge kit for lo‑fi photos. Many travel photographers in 2025 use small camera bodies and one or two light lenses. The key is to keep your camera ready but secure. You want to move through crowds, buses, or trails without worry and still keep that lo‑fi freedom.
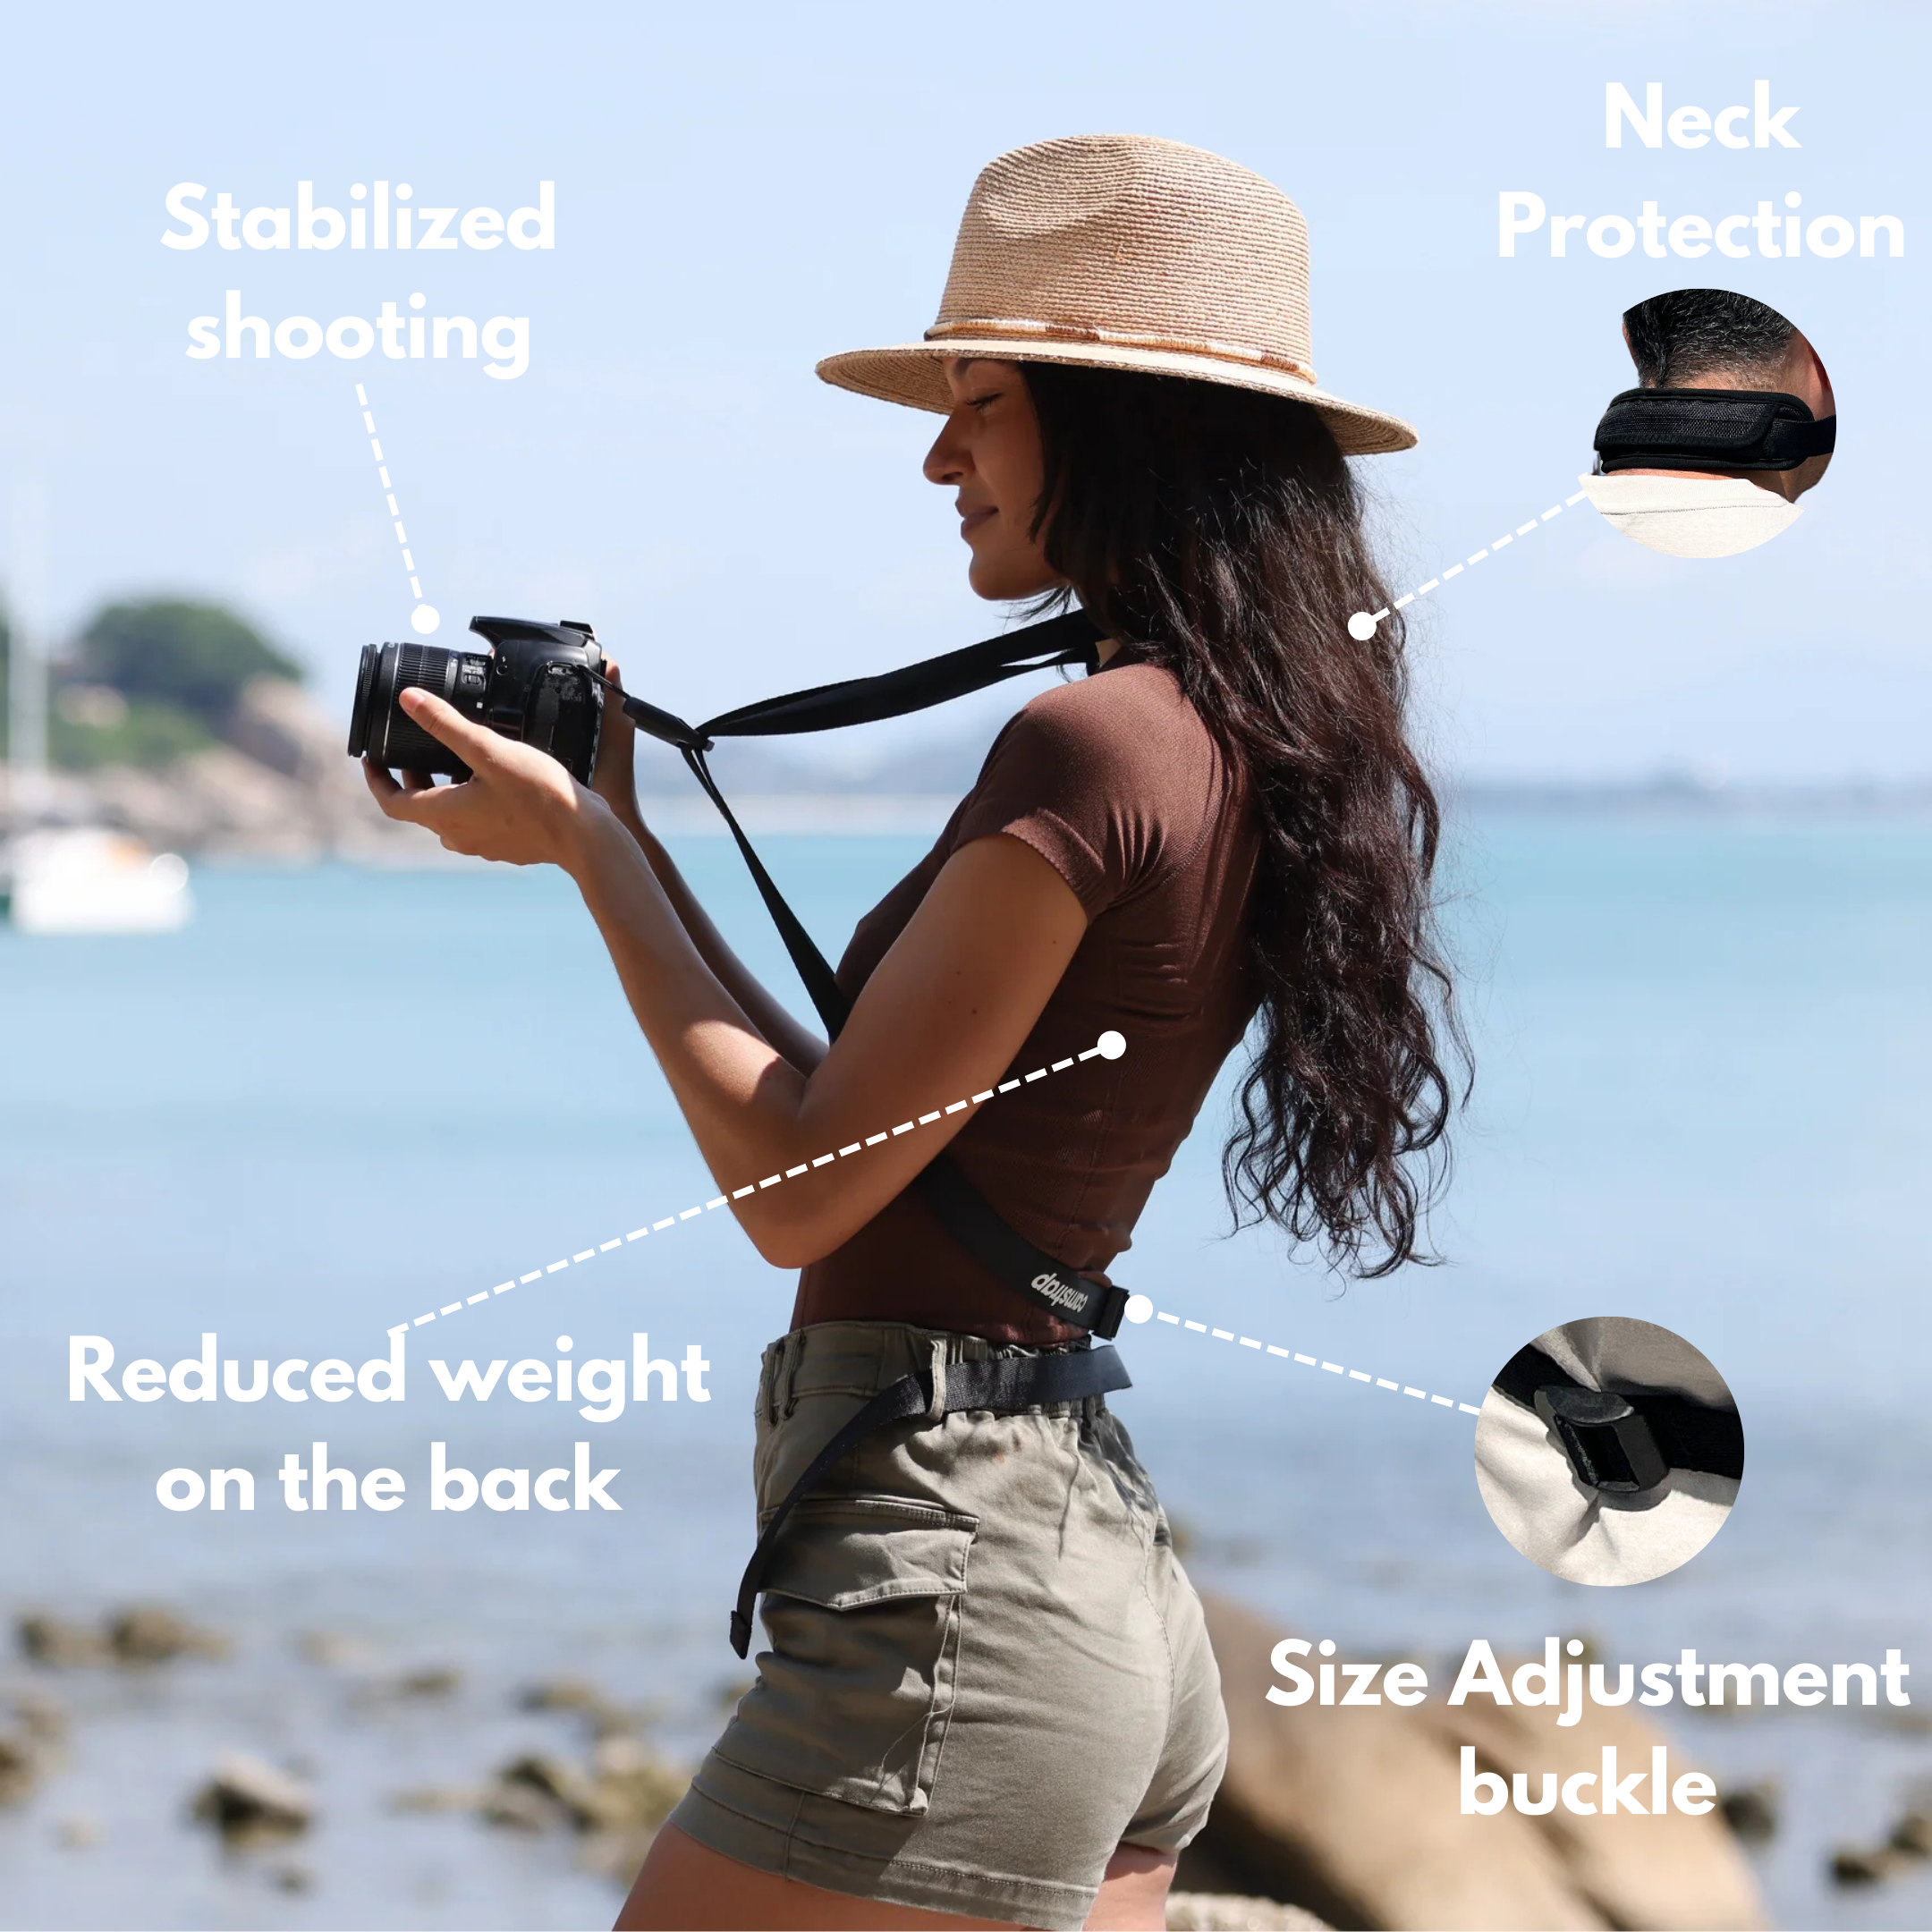
Why Your Camera Strap Matters for Lo‑Fi Travel
A good strap is one of the most important parts of a travel kit. It keeps your camera safe and affects how fast you can shoot. If you fight with your strap all day, you miss shots and get tired. If your strap feels smooth and strong, you feel free to chase lo‑fi motion and color anywhere.
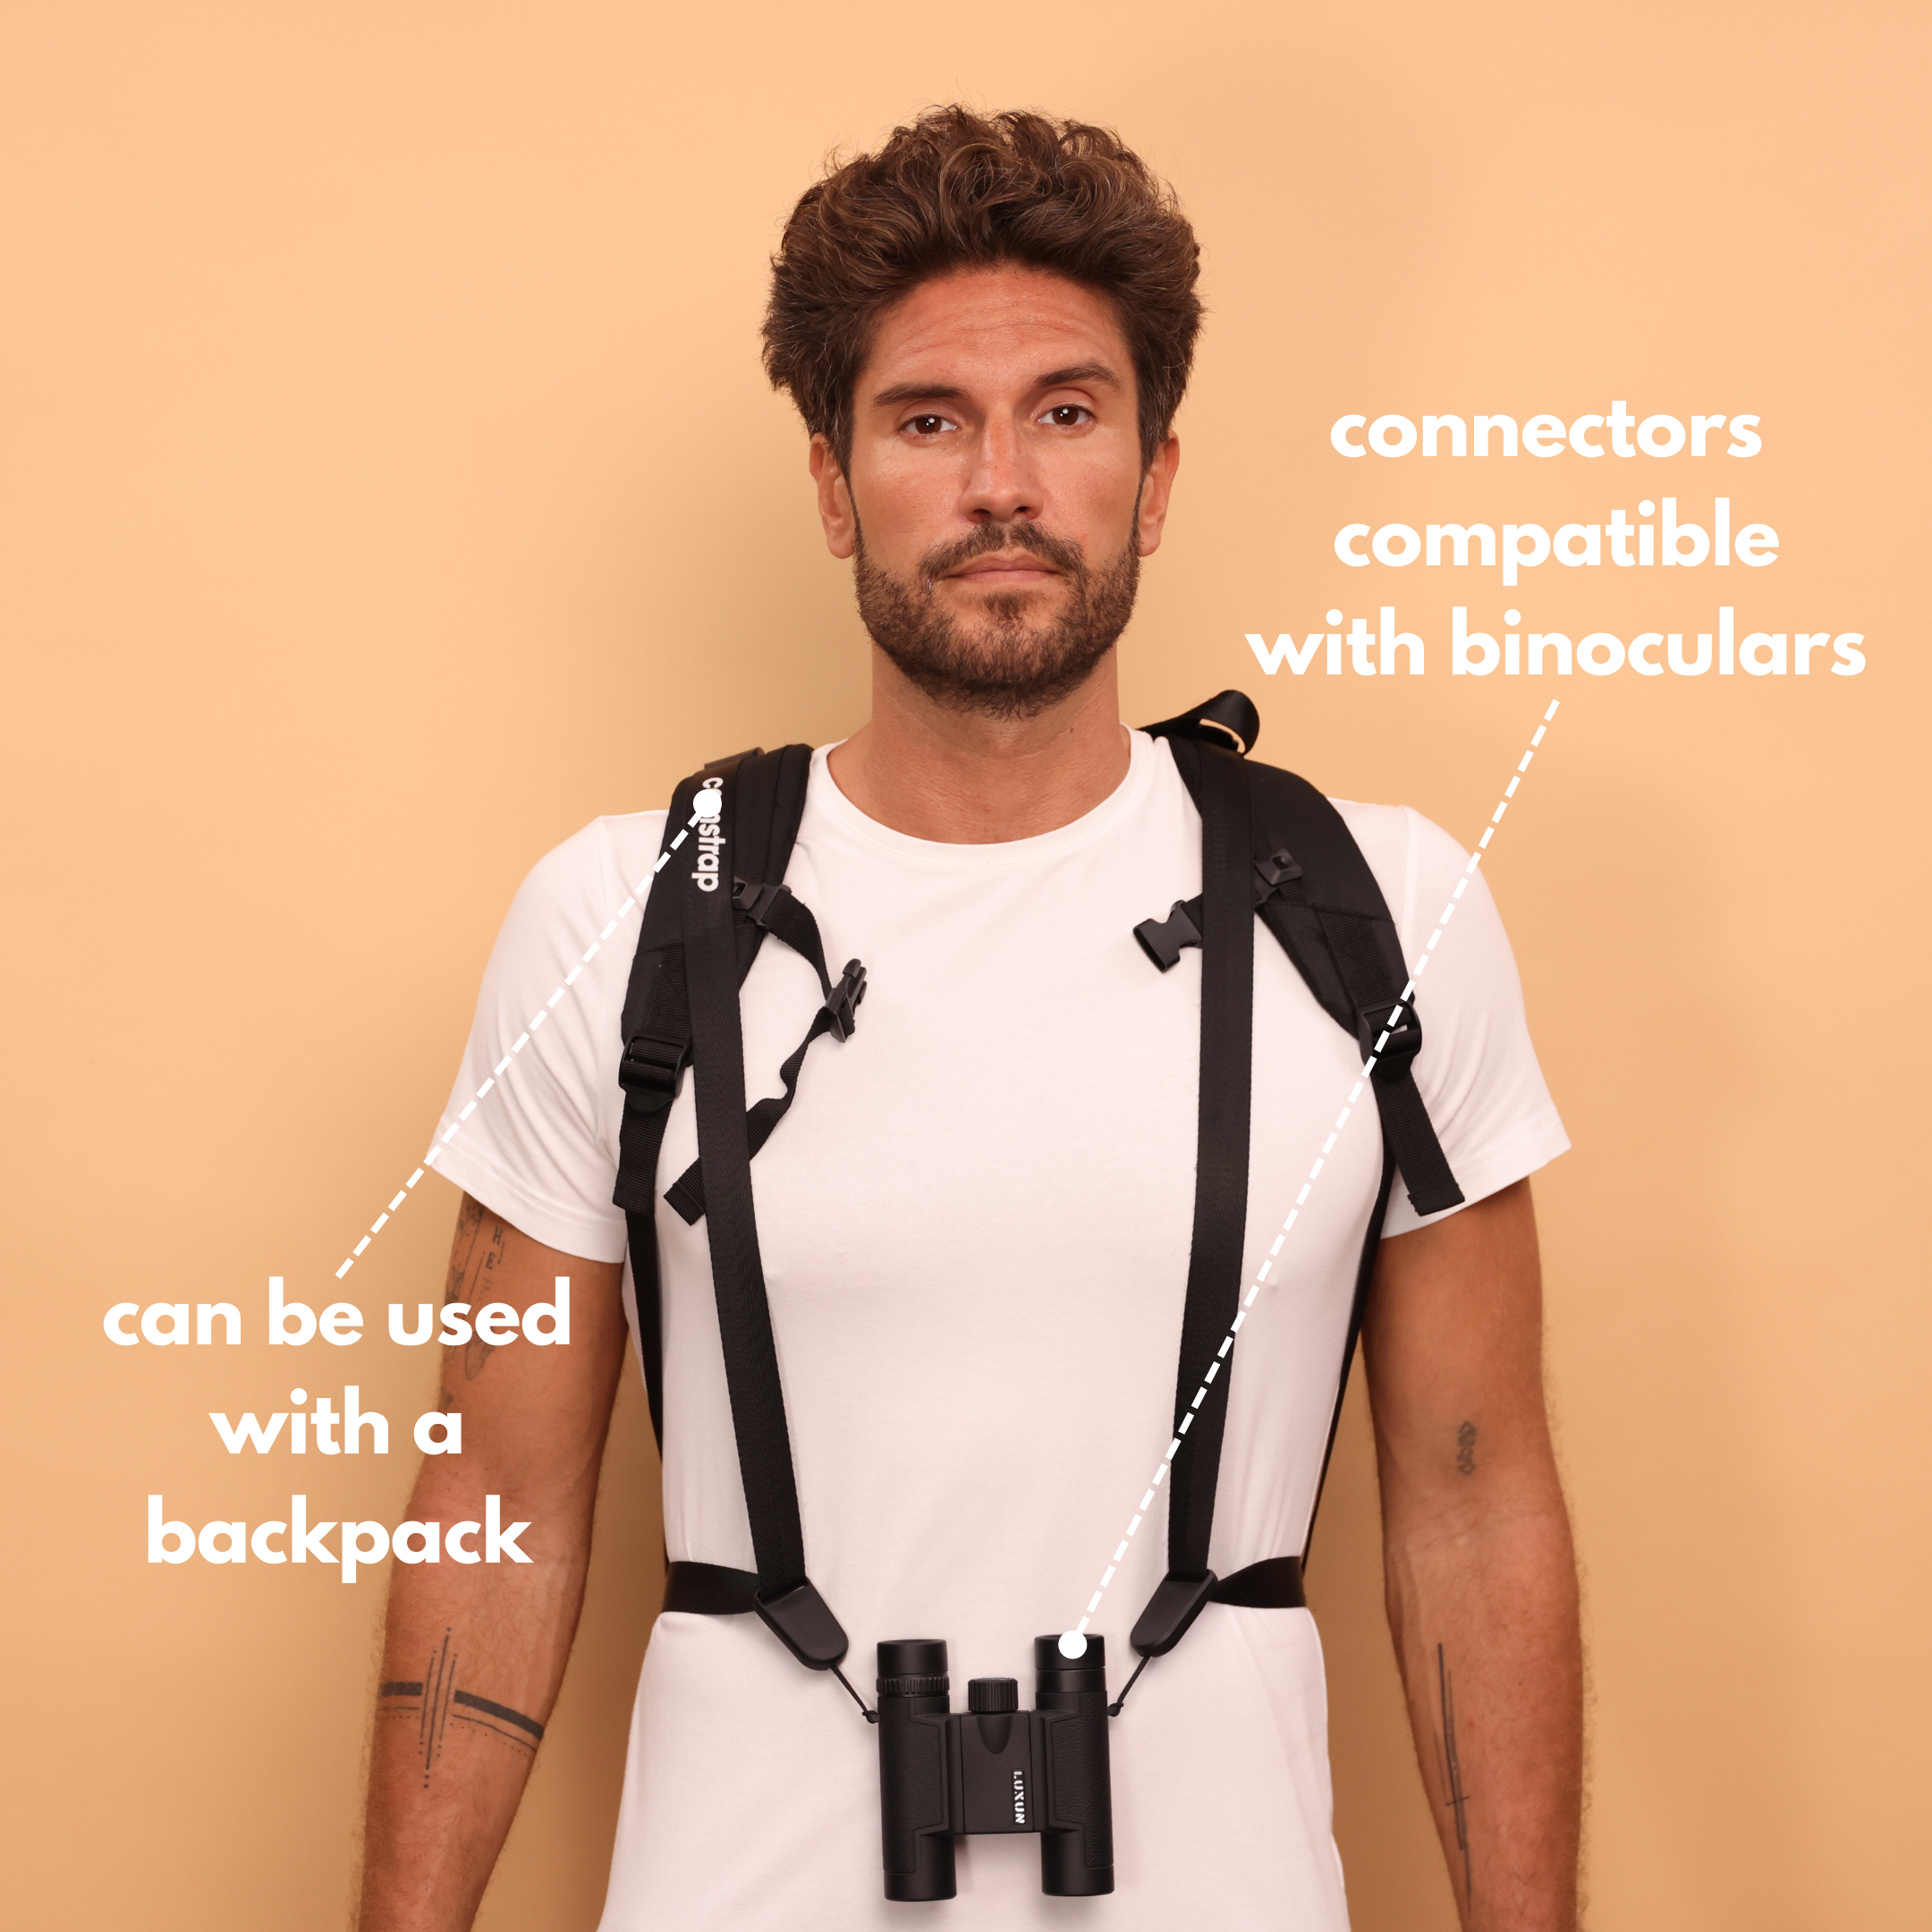
Camstrap builds straps with travel and lo‑fi shooting in mind. The brand designs and assembles its straps in France. Each model blends comfort, safety, and a clean, stylish look. For lo‑fi travel shooters, four Camstrap models are especially useful:
- Camstrap Voyager – Great for travel enthusiasts with compact or mirrorless cameras. It is light, stylish, and easy to wear all day.
- Camstrap Explorer – Built for outdoor adventure photographers who use heavier DSLR bodies and need extra support.
- Camstrap Nomad – A flexible choice if you move between cities, trails, and casual street shooting.
- Camstrap Magclip – Uses a quick magnetic system so you can clip the camera on or off fast. This is perfect for sudden lo‑fi moments.
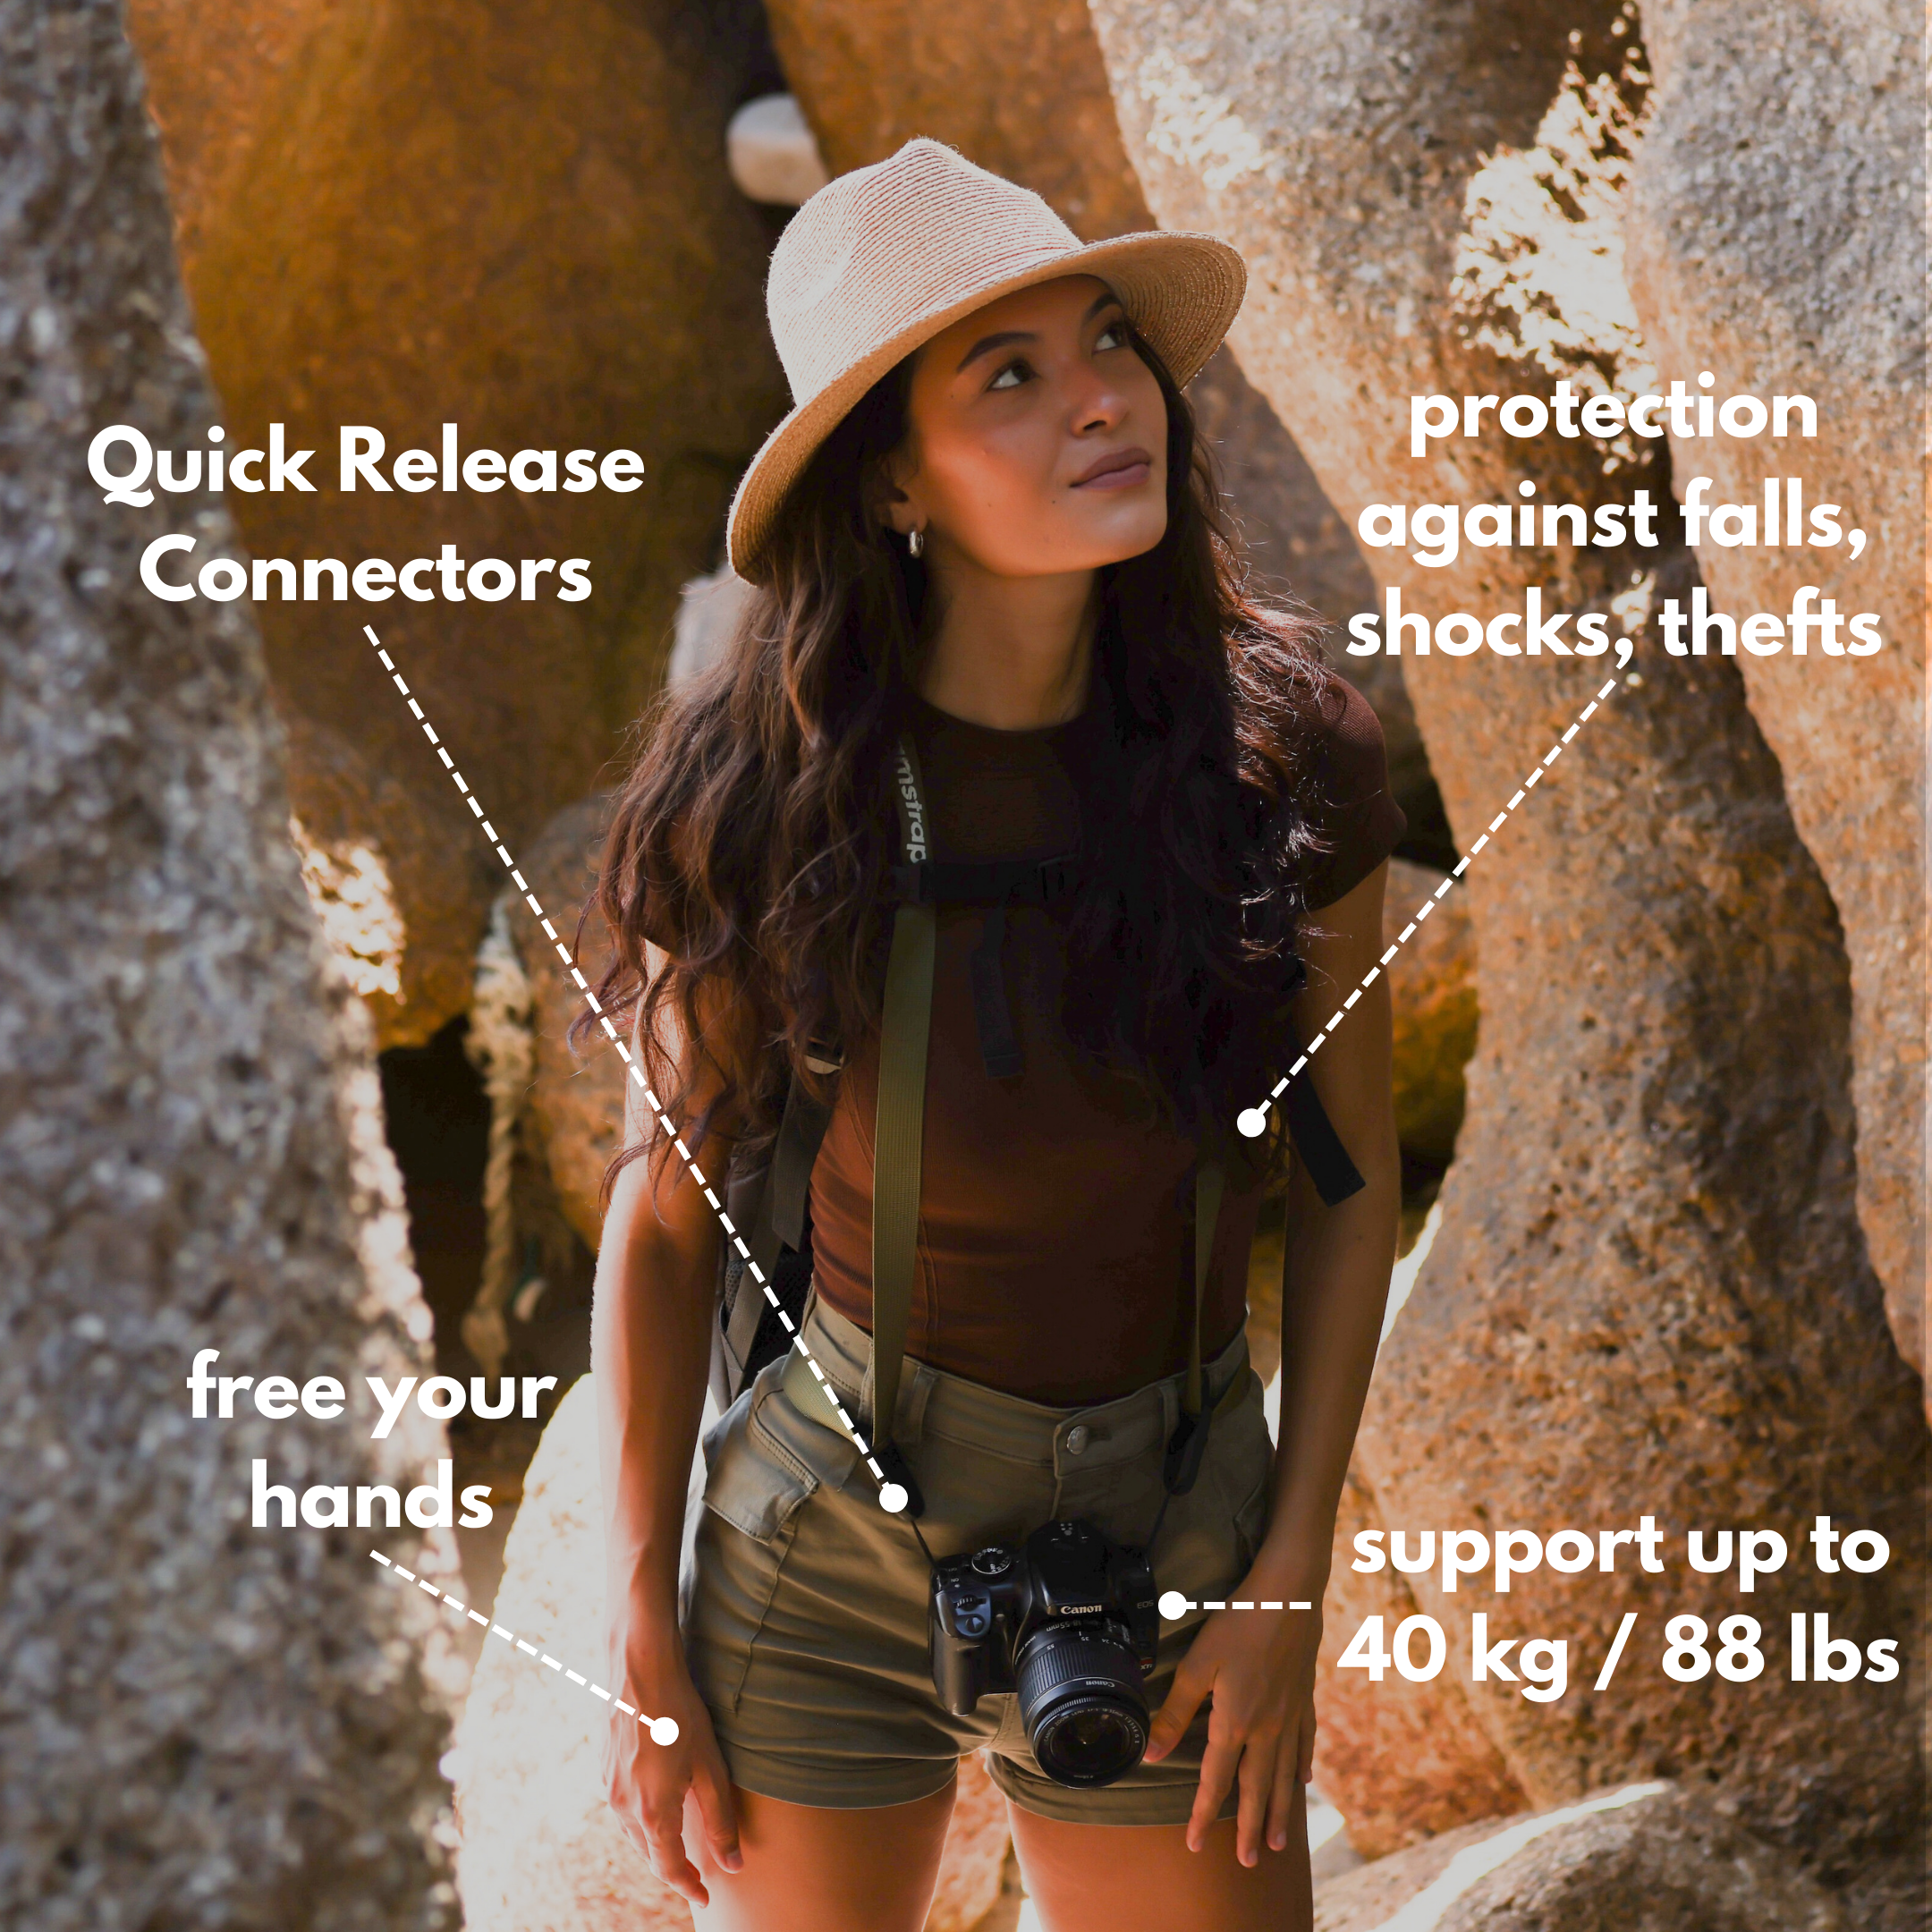
Camstrap also makes buying simple for travelers. You get free shipping on orders over €70, a 30‑day money‑back guarantee, and 100% secure payment options. There is also a “buy one, get the second at 20% off” offer. This helps if you carry two cameras or travel with a partner who also loves lo‑fi photography.
Safe Carry Tips While Constantly On the Move
Once you choose a strap, think about how you will move with it in real life. Good habits keep your camera safe while you chase lo‑fi shots:
- Wear the strap cross‑body, not just on one shoulder, to avoid slips in crowds.
- Keep the camera at your hip or chest, not swinging low near your knees.
- Use your non‑shooting hand to steady the camera when you walk fast or run for a train.
- In busy areas, slide the camera slightly under your jacket when you are not shooting.
- Use the Camstrap Magclip to detach the camera when you sit, but keep the strap around your body.
These simple steps let you move freely and react to scenes. They also keep your camera safer from drops or theft. Once your carry system feels solid, you are ready to work on the main lo‑fi techniques.
Mastering Motion Blur for Lo‑Fi Travel Photos
Motion blur is one of the strongest tools in lo‑fi travel aesthetics. It shows how fast a city moves or how a train rushes by. It can even show how rain slides down a window. Many photographers in 2025 use motion blur on purpose. It turns simple travel scenes into art.
Motion blur happens when your shutter speed is slow while something in the frame moves. The trick is to choose what you want sharp and what you want blurred. When you travel, you often do not have a tripod. So you must balance blur with hand‑held safety and still keep that lo‑fi feel.
Basic Camera Settings for Motion Blur on the Road
You can use either a camera or a phone for lo‑fi motion blur. The ideas stay the same. To start, try these steps:
- Switch to Shutter Priority (S or Tv mode) or use manual if you feel ready.
- Try shutter speeds around 1/15 to 1/30 second for walking people or slow traffic.
- For stronger blur, use 1/4 to 1 second, and brace yourself against a wall or rail.
- Set ISO as low as you can while still getting a bright image.
Bright light during the day can make long shutter speeds hard. In that case, use a smaller aperture like f/8 or f/11. You can also add a neutral density filter. At night, the problem flips. There is not enough light. Then you can raise ISO and accept some grain. This grain often fits the lo‑fi travel look very well.
Panning: Sharp Subject, Blurred Background
Panning is a classic motion blur trick that works well for lo‑fi travel scenes. You follow a moving subject, like a bike or tram, with your camera as you shoot. The subject stays fairly sharp. The background turns into streaks of blur. This adds a strong sense of speed and energy.
To pan while traveling, follow these steps:
- Stand with your feet wide and your elbows close to your body.
- Pick a subject that moves in a straight line across your view.
- Set shutter speed around 1/15 to 1/60 second, based on how fast it moves.
- Track the subject smoothly and press the shutter while still moving.
Do not worry if many shots do not look perfect. Even pros miss a lot of panning attempts. The lo‑fi aesthetic forgives small mistakes. Slight mis‑focus or extra blur can still look great and add character.
Hand‑Held Long Exposure Tricks Without a Tripod
Many travel enthusiasts do not want to carry a tripod. That is fine for lo‑fi images. You can still get motion blur hand‑held if you use your body and nearby objects as support. Try these simple ideas:
- Lean your back or shoulder against a wall or pole.
- Rest your elbows on a railing, table, or your knees.
- Hold your breath gently as you press the shutter.
- Use your Camstrap as a tension strap: step on it and pull the camera up to create steady tension.
The Camstrap Explorer and Camstrap Voyager are both strong enough for this trick. Your strap becomes part of your support system. This is very handy when you shoot lo‑fi motion blur in stations, markets, or busy streets.
Creating Soft Focus and Dreamy Lo‑Fi Vibes
Soft focus is another key part of lo‑fi travel aesthetics. Instead of sharp detail, you get a gentle, hazy look. This makes scenes feel like memories instead of strict records. Many AI tools in 2025 can fake soft focus. But you can also create it in‑camera while you move through a city or hike a trail.
Soft focus is not the same as a random blur mistake. You still choose what matters in the frame. The softness guides the viewer’s eye to the feeling of the scene, not just the small details. This is a big part of the lo‑fi mood.
Lens and Focus Settings for Soft Lo‑Fi Images
You can get soft focus with almost any camera. You do not need rare gear. Start with a few simple steps:
- Use Aperture Priority mode and choose a wide aperture like f/1.8 to f/2.8 if your lens allows it.
- Focus on a key subject, such as a friend’s eye or a bright sign.
- Let the background fall out of focus to create smooth blur.
- If your lens is very sharp, lower clarity slightly in editing to soften edges.
Some travel photographers use a clear filter with a tiny smear of petroleum jelly or a mist filter. Others shoot through thin fabric or plastic to add softness. Always protect your lens glass. Put anything only on a filter, not on the lens itself.
Using Movement and Layers for Soft Lo‑Fi Depth
Soft focus can also come from how you frame your scene. When you travel, look for layers you can shoot through. These layers add depth and a dreamy lo‑fi feel:
- Windows with light rain, steam, or dust.
- Leaves, flowers, or fences close to the lens.
- People walking in front of your subject.
Place these elements close to the lens and focus on something deeper in the frame. The front layer will blur into soft shapes and color. This creates a lo‑fi, dreamy mood with simple tools. It works very well on trains or buses when you shoot through glass while the world moves outside.
Boosting Color: High‑Saturation Lo‑Fi Travel Looks
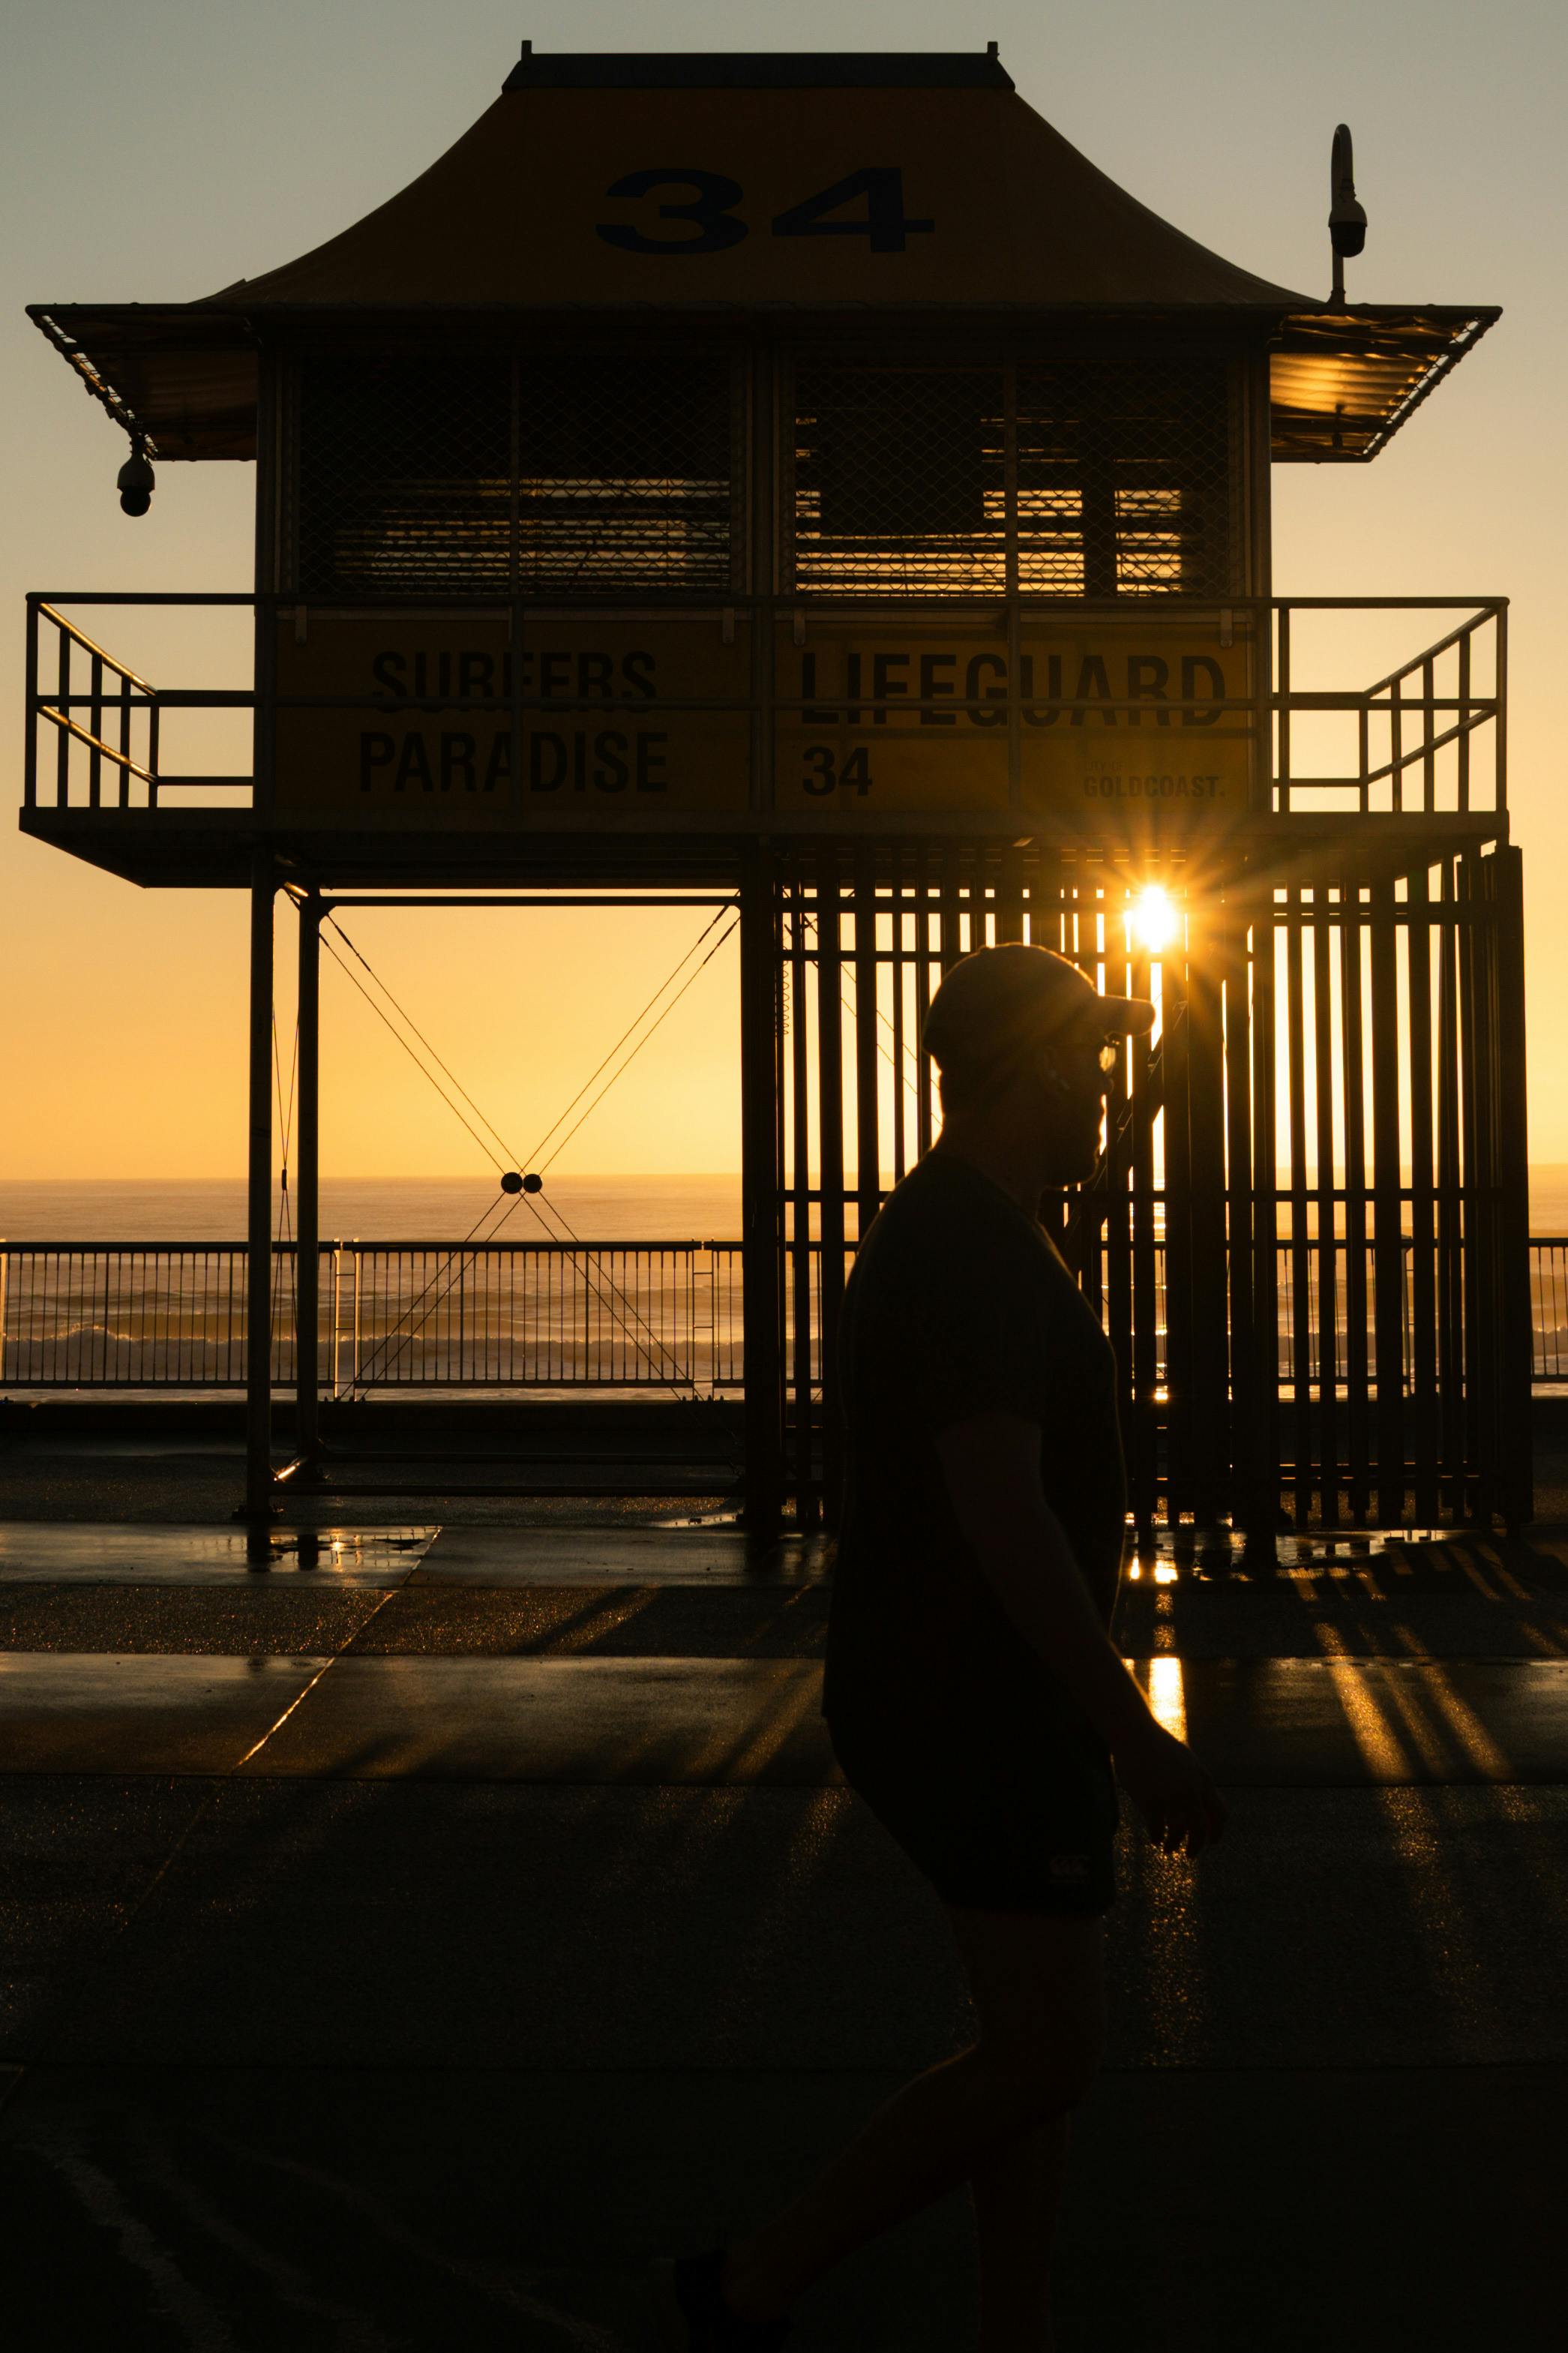
Many people think lo‑fi always means flat or faded colors. That is not true. In 2025, a big part of lo‑fi travel aesthetics uses bold, high‑saturation color that still feels like film. Think of neon signs at night, bright street markets, or deep blue hour skies. The key is strong color with a slight, natural flaw.
You can build this lo‑fi color in‑camera and in editing. The safest way while you travel is to get close in‑camera. Then you can fine‑tune with light edits on your phone or laptop.
In‑Camera Color Settings for Travel
Most cameras and phones offer color profiles or picture styles. For a high‑saturation lo‑fi look while traveling, you can:
- Choose a vivid or film‑like profile if your brand offers it.
- Increase saturation slightly, but avoid pushing it to the maximum.
- Warm the white balance a bit for sunsets and cozy indoor scenes.
Over‑saturated photos can look fake and harsh. Lo‑fi color should feel like an old postcard or film scan. It should not look like a cartoon. If you are not sure, shoot in RAW or a high‑quality mode. This gives you more room to fix color later without losing the lo‑fi feel.
Simple Editing Steps for Lo‑Fi Color on the Go
AI editors have grown fast. Many social media images now use AI tools for quick lo‑fi looks. Some apps let you type prompts like “give this a lo‑fi film look” or “add warm, saturated colors with grain.” These tools are great when you edit in hostels, trains, or airports.
You can also do simple manual edits for more control:
- Lower contrast a bit to soften the image.
- Raise vibrance more than saturation for a smoother color boost.
- Add a touch of grain to mimic film and hide small noise.
- Shift highlights slightly warm and shadows slightly cool for gentle color split.
These steps keep the lo‑fi travel mood while your colors still pop. Try to build one or two presets that match your taste. Then you can apply them fast and give your whole trip a steady lo‑fi style.
Practical Safety and Workflow Tips for Lo‑Fi Travel Shooters
So far, we have talked about lo‑fi style and camera settings. But if you travel often, you also need a safe, simple workflow. You must protect your gear, your files, and your body. Smart habits and a solid strap system like Camstrap can make a big difference.
Protecting Your Camera and Your Body
Outdoor adventure photographers and frequent travelers often shoot all day. A bad strap or poor posture can cause pain in your neck, back, or wrists. Over time, this can limit how long you can chase lo‑fi motion and color.
To avoid that, try these habits:
- Use a wide, padded strap like the Camstrap Explorer for heavier cameras.
- Switch shoulders or carry cross‑body to spread the weight.
- Keep your elbows in and your wrists straight when you shoot.
- Take short breaks every hour to stretch your neck and shoulders.
If you use a lighter mirrorless or compact camera, the Camstrap Voyager or Camstrap Nomad will likely be enough. These straps balance strength and comfort. They suit amateur photographers who want a stylish, low‑profile strap that still protects their camera on lo‑fi trips.
File Safety: Keeping Your Lo‑Fi Memories Backed Up
Lo‑fi travel images often capture unique moments you cannot repeat. A missed backup can mean losing a whole city, hike, or night walk. To stay safe, build a simple backup routine that you can follow each day.
- Carry at least two memory cards and switch them during long days.
- Back up each night to a small SSD or your laptop.
- Use cloud backup when you have strong Wi‑Fi, even if uploads are slow.
- Keep one card in your wallet and one in your bag, not all in one place.
This way, even if you lose a bag or camera, your lo‑fi travel story stays safe. It also lets you edit and share quickly. That is useful for social posts, travel blogs, or client work that needs the lo‑fi look.
Respectful Lo‑Fi Shooting in Public Spaces
Lo‑fi travel aesthetics often include candid shots of people in motion. But you still need to respect privacy and local rules. In some places, street photography is welcome. In others, people may feel uneasy when they see a camera.
To stay respectful while you chase lo‑fi scenes:
- Learn basic local customs about photos before you arrive.
- Make eye contact and smile if you photograph people close up.
- Offer to show them the photo and delete it if they do not like it.
- Avoid shooting children or private moments without clear consent.
Lo‑fi does not mean careless or rude. The best lo‑fi travel photos show real life with care and empathy. This attitude also makes your trips smoother and more fun.
Putting It All Together: Your Lo‑Fi Travel Workflow in 2025
Now let’s combine everything into a simple lo‑fi workflow you can use on your next trip. This plan will help you capture motion blur, soft focus, and high‑saturation color safely. It works even when you are always on the move with your camera on a Camstrap.
A Sample Day in a Lo‑Fi Travel Shoot
Imagine you are exploring a new city for one day. Here is how a lo‑fi travel day might look from morning to night:
- Morning: Attach your camera to a Camstrap Voyager or Nomad cross‑body. Set Aperture Priority around f/2.8 for soft‑focus street portraits and quiet scenes in gentle light.
- Midday: Switch to Shutter Priority at 1/30 second for motion blur in markets or traffic. Use walls, rails, or your strap tension trick for support when needed.
- Golden hour: Focus on high‑saturation color. Use a vivid profile, warm white balance, and shoot into the sun for flares and glow that match the lo‑fi mood.
- Night: Raise ISO, embrace grain, and shoot moving lights with slow shutter speeds for streaks. Use your Camstrap Explorer or Voyager as support while you walk.
At the end of the day, back up your files and apply a simple lo‑fi preset. Share a few images if you like. Then rest your body and your gear so you are ready to hunt for more lo‑fi stories the next day.
Choosing the Right Camstrap for Your Travel Style
Different travelers have different needs, even when they all love the lo‑fi look. Here is a quick guide based on common personas and how they move:
- Travel Enthusiasts: Often use compact or mirrorless cameras and move through airports and cities. The Camstrap Voyager gives them style, low weight, and comfort. International shipping with tracking makes it easy to order before a big trip.
- Outdoor Adventure Photographers: Carry heavier DSLRs and shoot in rough weather or on trails. The Camstrap Explorer offers strong support and an ergonomic shape. This helps during long, active days in the mountains or on the coast.
- Amateur Photographers: Want reliable gear at a fair price and enjoy smart deals. The Camstrap Nomad or a combo of a main strap plus Camstrap Magclip using the second‑strap‑20%‑off offer gives them room to grow.

All Camstrap products come from careful design and assembly in France. The brand focuses on quality, durability, and user comfort. For people who value safe payment and clear shipping, this adds peace of mind. It also fits the spirit of lo‑fi travel, where small details and craft matter.
Conclusion: Embrace the Lo‑Fi Travel Aesthetic Safely and Confidently
Lo‑fi travel aesthetics in 2025 are about more than filters or quick presets. They are about how you move, how you see, and how you share your journey. Motion blur shows the rush of a city. Soft focus turns a simple street into a dream. High‑saturation color makes markets, sunsets, and neon nights come alive in a lo‑fi way.
When you mix these lo‑fi tools with safe habits and smart gear, you gain real freedom. A solid strap system like the Camstrap Voyager, Explorer, Nomad, or Magclip keeps your camera secure and ready. Simple settings and light editing let you work fast, even on crowded trains or windy cliffs.
So on your next trip, lean into the lo‑fi travel aesthetic. Let your photos be a little imperfect, a little grainy, and very alive. With the right mix of motion blur, soft focus, bold color, and safe carry, you will build a lo‑fi travel story that feels true to how 2025 really looks and feels on the road.


